← Back to blogPostgreSQL
Getting started with Django, PostgreSQL, and Readyset
Real-world applications face performance challenges with growing data and user traffic. Caching mitigates these challenges by storing frequently accessed data, reducing database fetches, improving response times, and enhancing application scalability, reliability, and user experience. Readyset is a caching engine for Postgres and MySQL databases, requiring minimal adjustments to existing setups. Its wire-compatible design means that the only modification necessary is to adjust the connection st
Rishi Raj Jain
2024-05-16 · 11 min read
Real-world applications face performance challenges with growing data and user traffic. Caching mitigates these challenges by storing frequently accessed data, reducing database fetches, improving response times, and enhancing application scalability, reliability, and user experience.
Readyset is a caching engine for Postgres and MySQL databases, requiring minimal adjustments to existing setups. Its wire-compatible design means that the only modification necessary is to adjust the connection string. Operating in real-time, Readyset ensures that cached data remains synchronized with the source of truth database, thereby minimizing the risk of data inconsistencies and ensuring data integrity. With Readyset, you can optimize read operations, achieving sub-millisecond query latencies and improving application performance.
In this guide, you will explore how to set up a Django application integrated with Readyset using Docker. You will begin by setting up a Postgres instance and then proceed to configure Readyset to connect to this instance. Afterward, you will create a Django application and learn how to leverage Readyset for caching PostgreSQL queries, enhancing performance.
Prerequisites
You will need the following to start following this guide:
- Python 3.6+ or later
- Docker
Tech Stack
You will be using the following technologies in this guide:
| Tech | Type | Description |
|---|---|---|
| Django | Framework | A high-level Python web framework. |
| Readyset | Platform | A real-time SQL caching engine for Postgres and MySQL. |
| PostgreSQL | Database | A powerful, open-source object-relational database system. |
| Docker | Platform | An open platform for developing, shipping, and running applications. |
Using Docker to Set up a Postgres Instance
Let's start by setting up a Postgres instance using Docker. Run the following command in your terminal:
docker run -p 5432:5432 --name my-postgres-container -e POSTGRES_PASSWORD=mysecretpassword -d postgres
This command creates a Docker container named my-postgres-container running a Postgres database. It maps port 5432 of the container to port 5432 of the host machine and sets the environment variable POSTGRES_PASSWORD to mysecretpassword.
Next, let's connect to the Postgres instance using the psql command-line tool:
psql -h localhost -p 5432 -U postgres
Here, -h specifies the host, -p specifies the port, and -U specifies the username. We are connecting to the default Postgres user named postgres.
Logical replication is useful for replicating specific changes made to the database, rather than replicating the entire database. This can be advantageous in various scenarios such as data integration and scaling. It allows Readyset to update the database in real-time with only the necessary changes, improving efficiency and minimizing resource usage.
Once connected, execute the following command to enable logical replication:
postgres=# ALTER SYSTEM SET wal_level = logical;
After enabling logical replication, it's recommended to restart the Postgres container for the changes to take effect:
docker container restart my-postgres-container
With this, the Postgres instance is set up and ready to use.
Using Docker to set up a Readyset instance
In this section, you will set up a Readyset instance locally using Docker, connecting it to the local Postgres database you just set up.
💡
If you would prefer a cloud service to run a Readyset instance, check out the process of onboarding to Readyset Cloud. Alternatively, if you prefer to self-host, you can download Readyset from readyset.io/download and set it up on your own infrastructure.
First, download the Readyset Docker image from DockerHub by executing the following command:
docker pull readysettech/readyset
Note: If your database is running locally, you will need to use host.docker.internal rather than localhost to proxy and cache using Docker instance correctly.
Now, you are ready to start Readyset. In your terminal, run the following command:
docker run -d -p 5433:5433 -p 6034:6034         \
--platform linux/amd64         \
--name readyset         \
-e UPSTREAM_DB_URL=postgres://postgres:mysecretpassword@host.docker.internal:5432/postgres         \
-e LISTEN_ADDRESS=0.0.0.0:5433         \
readysettech/readyset
This command starts a Readyset container, connecting it to the local Postgres database. The Readyset instance accepts connections at the port 5433 on localhost, acting as a drop-in replacement for your local Postgres database. The command uses the connection URL string of your local Postgres database as the UPSTREAM_DB_URL, to use it as the origin to run non-cached queries.
Readyset will then connect to your database and replicate all your database tables. Once the Docker container starts running, browse it’s logs. Here’s a sample of how the logs will look like:
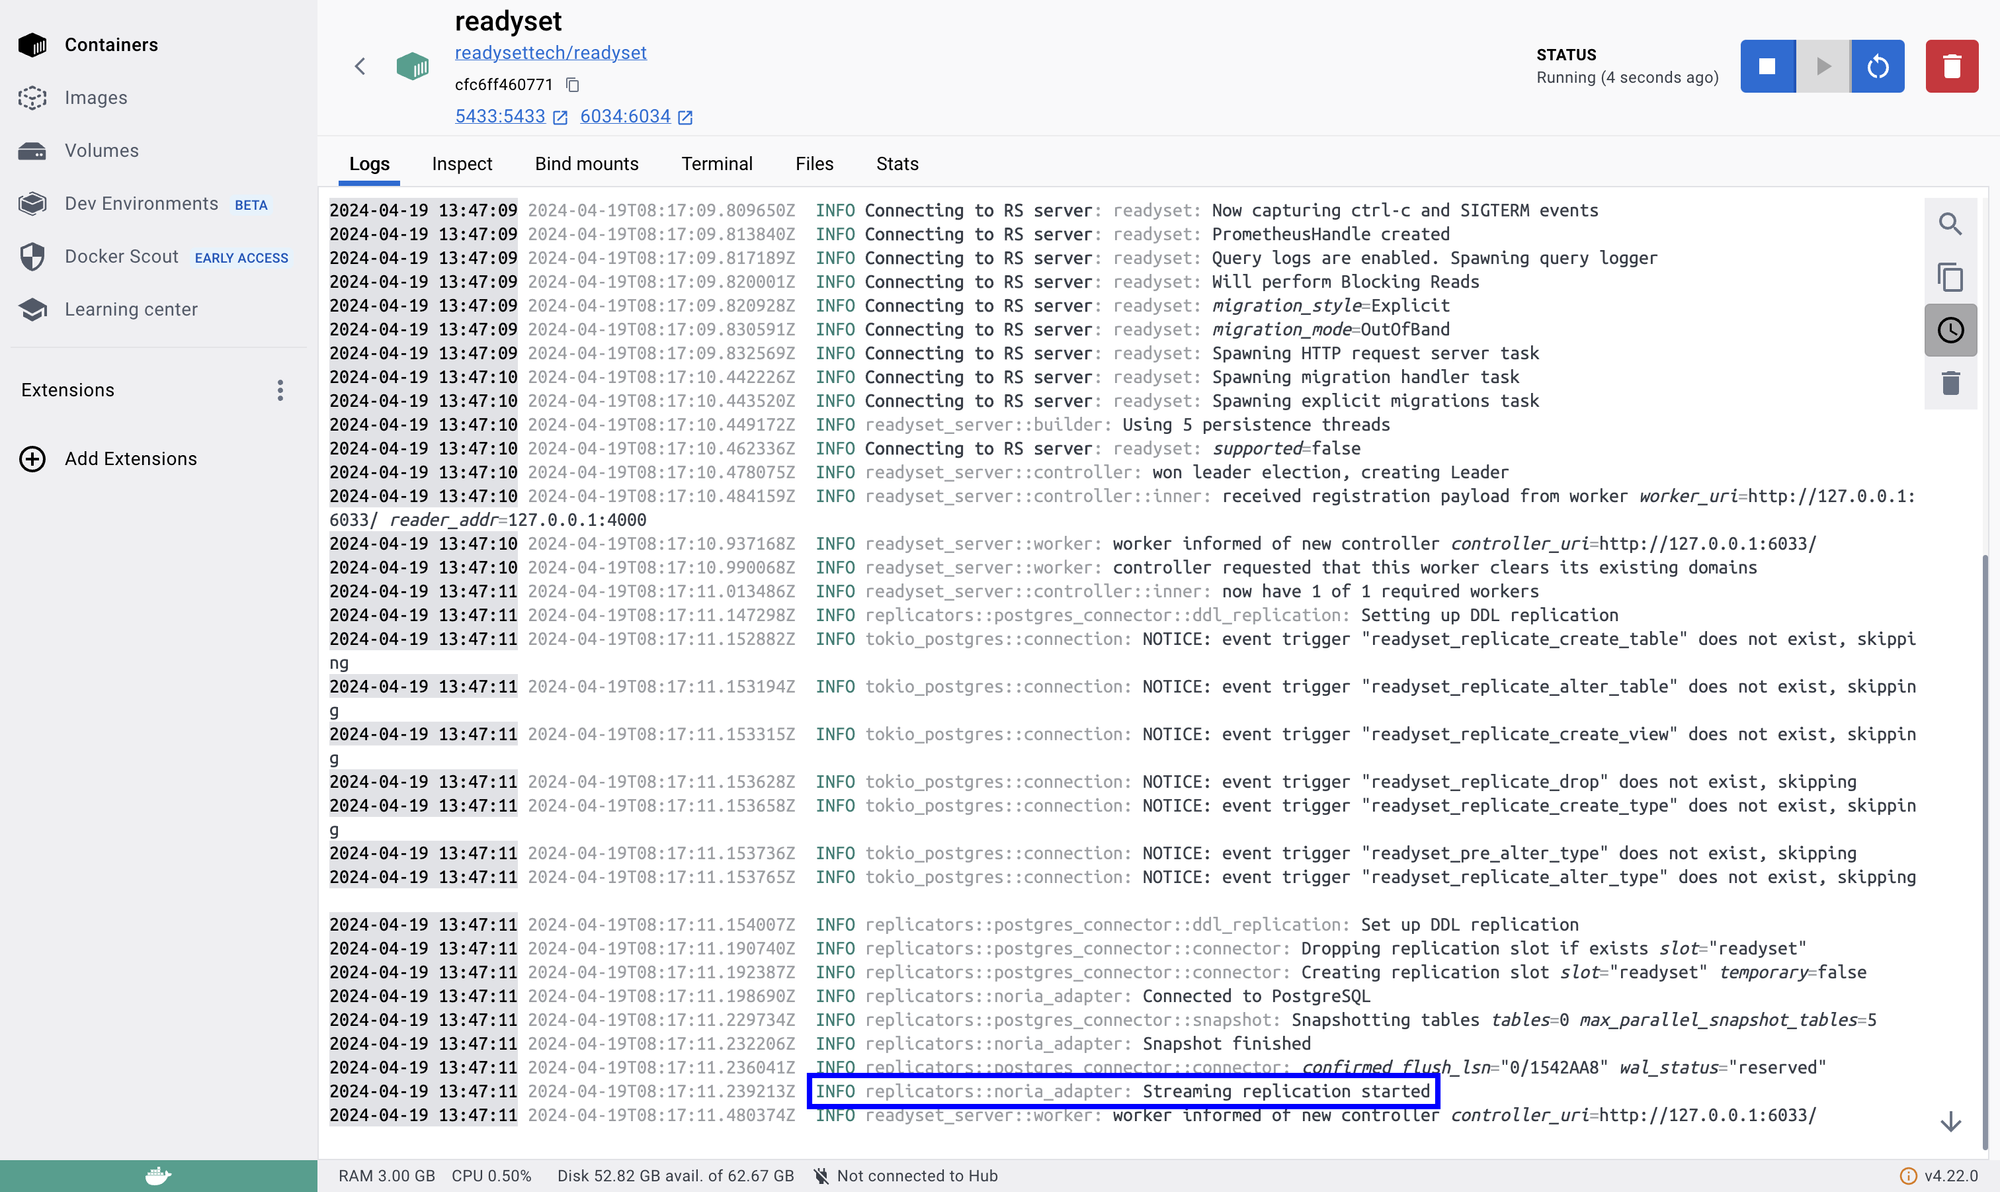
Once you see Streaming replication started in the logs, it’s a green signal that Readyset is ready to start caching your queries.
Now that the Readyset Docker container is up and running, let’s connect to the Readyset Postgres instance using the PostgreSQL interactive terminal.
Connect to Readyset instance using PostgreSQL interactive terminal
To connect to the Readyset Postgres instance, open your terminal and execute the following command:
psql 'postgresql://postgres:mysecretpassword@127.0.0.1:5433/postgres'
After executing this command, you should be connected to the Readyset Postgres instance and ready to execute SQL commands in the PostgreSQL interactive terminal, the psql shell.
To verify that Readyset is running fine, execute the following command in the psql shell:
postgres=> SHOW READYSET STATUS;
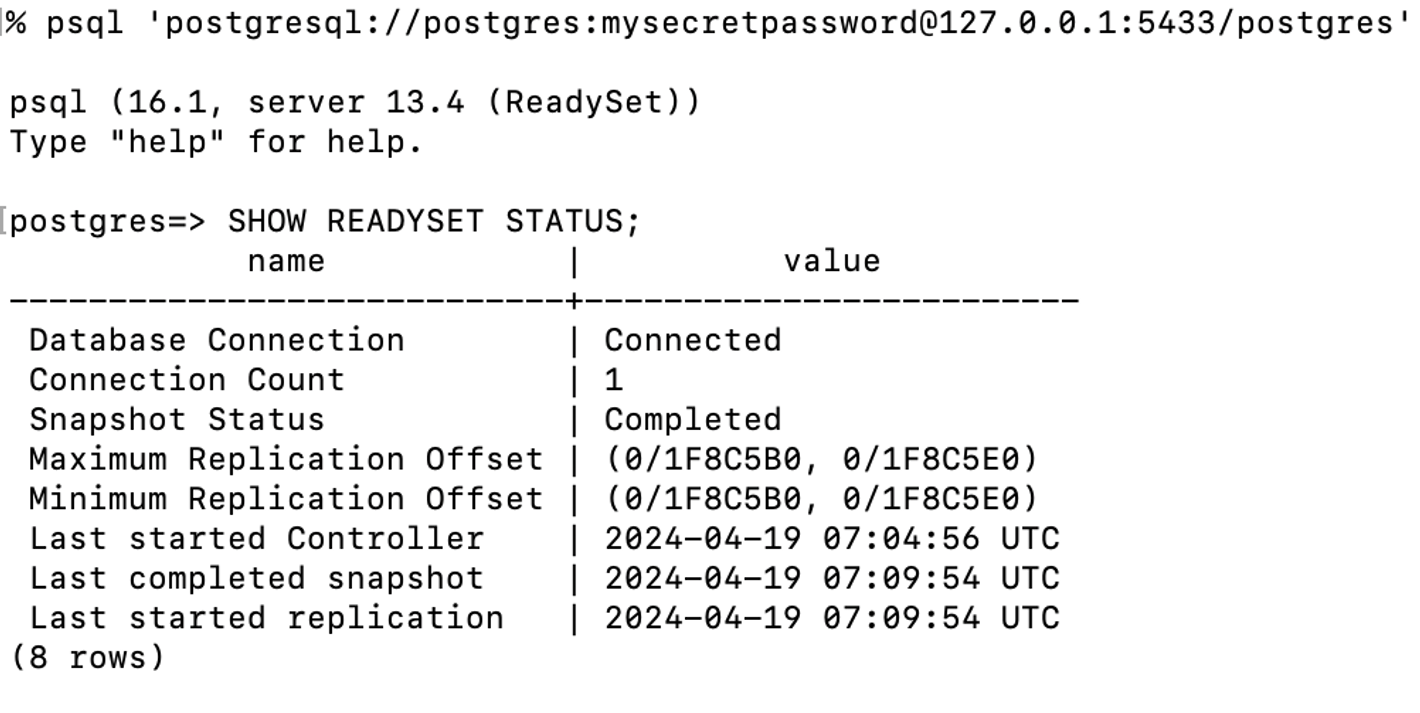
The value of Database Connection as Connected and Snapshot Status as Completed indicates a successful setup of your Readyset instance.
Now that you have ensured Readyset is running fine and are connected to the Readyset Postgres instance, let’s visually understand how incoming requests to the Readyset Postgres instance are processed.
A SQL query cached in Readyset avoids the origin (your local Postgres instance) and the response is returned via the Readyset Postgres instance resulting in a much faster response.
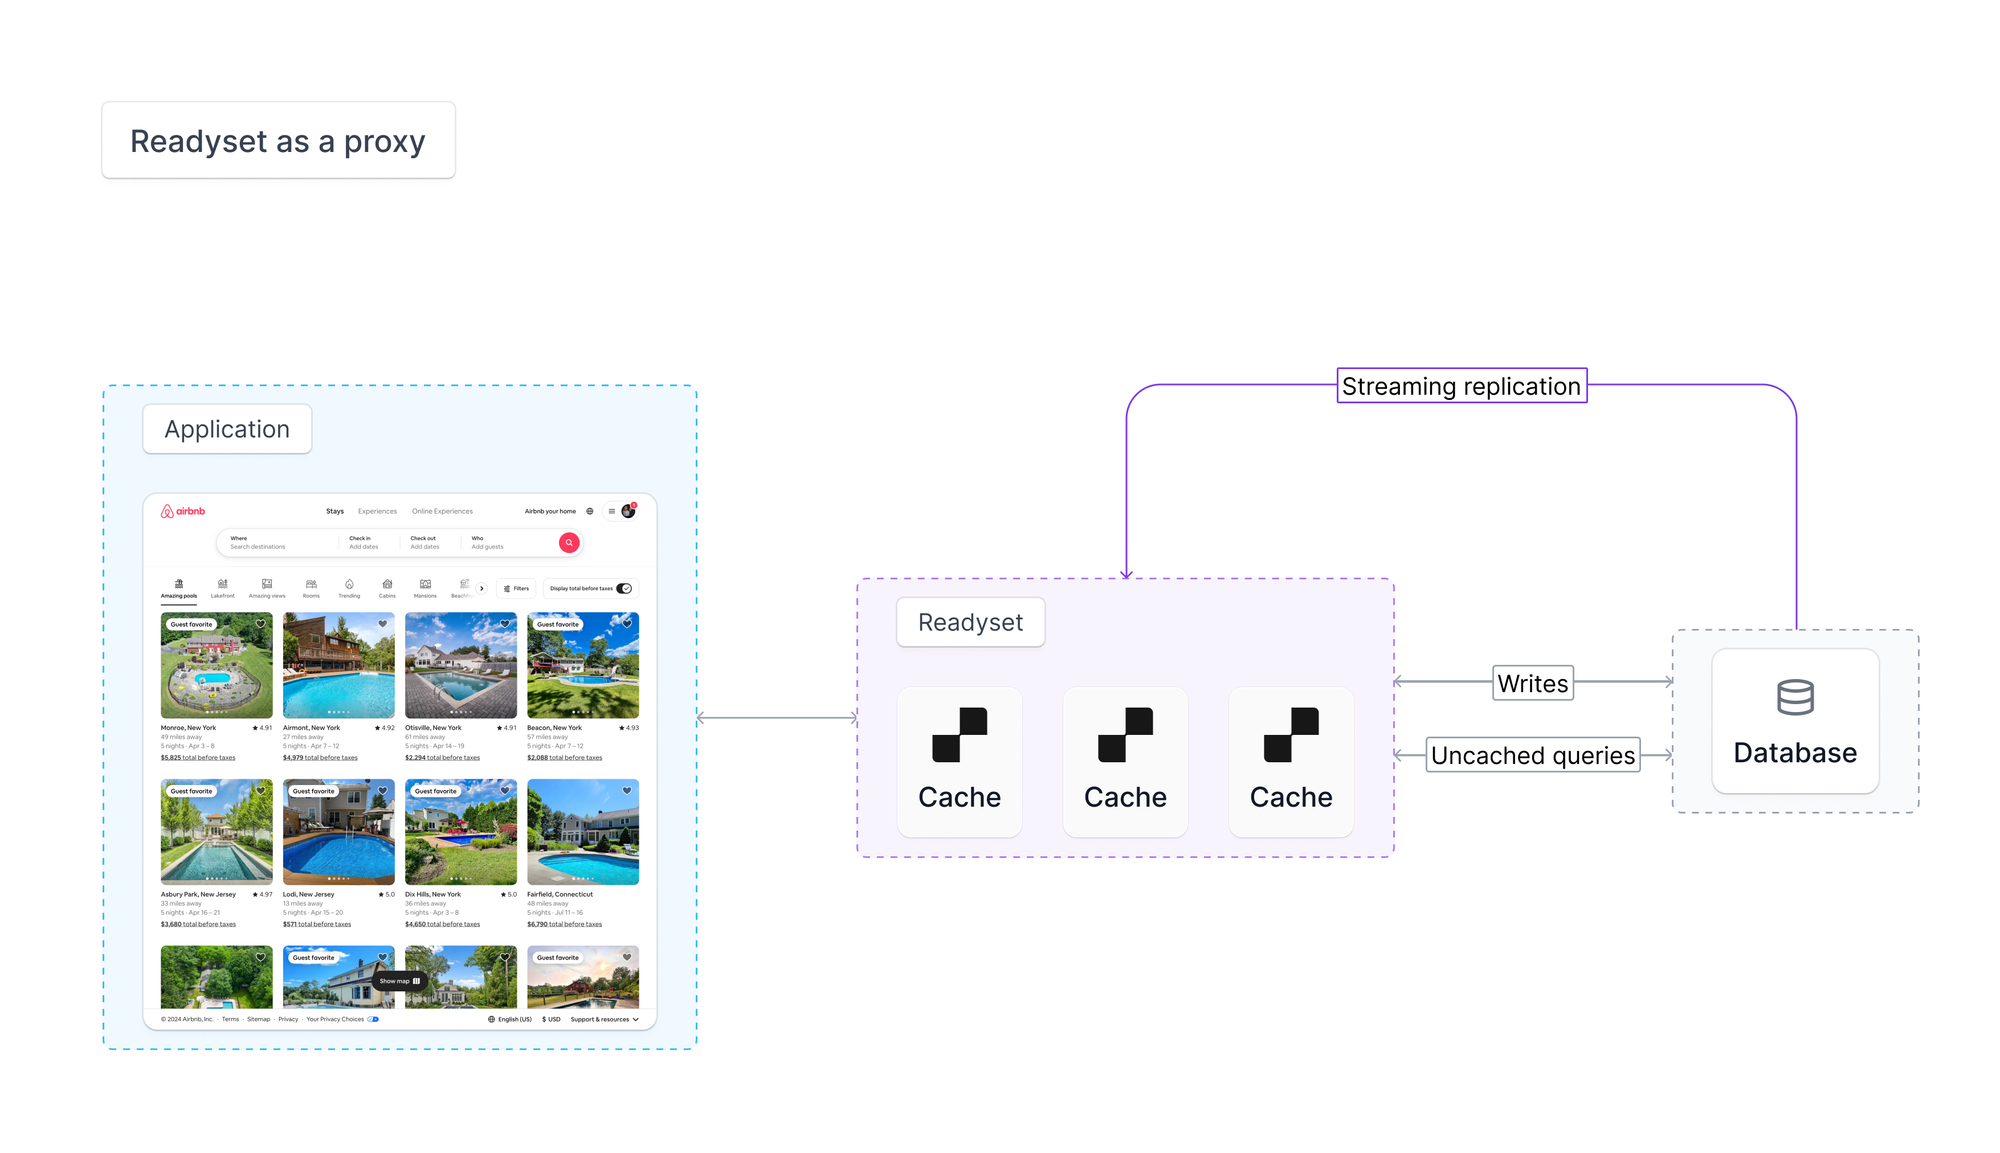
Database operations that modify data, like INSERTs or UPDATEs, as well as queries that have not been cached will be proxied to your database. Once the write operation is complete, Readyset automatically updates its cache to ensure subsequent reads receive the most up-to-date data.
This setup provides a scalable solution for managing database operations within a Django application. By using Readyset, you’re able to offload read requests from your primary and preserve resources for write operations and more complex transactions that can’t be cached. In essence, Readyset acts as a proxy between your Django app servers and your database. The result is a more resilient system that can handle large volumes of requests with low response times.
With a clear understanding of how Readyset caching works, let's proceed with creating a new Django application. You will integrate it with the Readyset instance by configuring the database settings in the mysite/settings.py file. This will allow our Django application to interact with the Readyset database, seamlessly.
Create a new Django application
Let’s get started by creating a new Django project. Execute the following commands to install the necessary libraries for creating a Django application:
pip install psycopg2-binary
pip install django
The above command installs the following packages:
psycopg2-binary: A PostgreSQL database adapter for the Python programming language.django: A high-level Python web framework.
Once they are installed, create a new Django application with the following command:
python -m django startproject mysite
cd mysite
Great, you have successfully set up a new Django application.
Next, let’s connect it to the Readyset (Postgres) instance by performing the following changes in mysite/mysite/settings.py file:
DATABASES = {
    'default': {
-        'ENGINE': 'django.db.backends.sqlite3',
-        'NAME': BASE_DIR / 'db.sqlite3',
+        'ENGINE': 'django.db.backends.postgresql_psycopg2',
+        'NAME': 'postgres',
+        'USER': 'postgres',
+        'PASSWORD': 'mysecretpassword',
+        'HOST': '127.0.0.1',
+        'PORT': '5433',
    }
}
In the changes above, the database engine is changed from SQLite to Postgres. Further, you have added the values that are required to connect to the Postgres instance.
Since you have changed the default database, create and apply migration files containing Python code that describes the changes to be made to the database schema. To do so, execute the following commands:
python manage.py makemigrations
python manage.py migrate
Now, let’s create a user that has all the administrative rights to the Django application by executing the following command:
python manage.py createsuperuser
You would be asked to enter the credentials for the super user, which for now, can be randomly set as you won’t need it in the future.
To fetch data from Postgres and render HTML using Django, you are going to create an application inside it containing the expected data structure and the HTML template. To start creating an app inside Django, execute the following command:
python manage.py startapp products
A products directory would now be created inside the mysite directory that contains [views.py](<http://views.py>) and models.py. Here’s what you will use both those files for:
- views.py: To define application routes (pertaining to products).
- models.py: To define the structure of an item in the
productstable in Postgres.
First, let’s define the structure aka fields that are expected to be present inside each record in the products table in Postgres. To keep things simple to understand, you are going to create three fields, namely, slug, image and description storing an identifier of the product(s), their image(s), and text based description(s). Make the following changes in mysite/mysite/products/models.py file to do the same:
from django.db import models

# Create your models here.
+ class Product(models.Model):
+     slug = models.TextField()
+     image = models.TextField()
+     description = models.TextField()
To make sure that the products application is automatically loaded while running the Django application, update the mysite/mysite/settings.py file to include the products app:
INSTALLED_APPS = [
+    "products",
    'django.contrib.admin',
    'django.contrib.auth',
    'django.contrib.contenttypes',
    'django.contrib.sessions',
    'django.contrib.messages',
    'django.contrib.staticfiles',
]
Since the data models used in the application have been updated, create and apply the migration files generated (to represent the database schema changes) by executing the following commands:
python manage.py makemigrations
python manage.py migrate
Once finished, a table named products_product would be created in your Postgres instance.
Great, now that you have synced the changes in Django with Postgres, it’s time to test the application in action. Execute the following command to start your Django application:
python manage.py runserver 0.0.0.0:5003
Let’s keep this terminal running to anytime access the application while following the guide. Django reloads the application to reflect the output of the latest code in case of any changes.
Rendering Product Listings with Django Views
In Django, rendering dynamic HTML is done in two parts: by fetching the data from database using Django Models, and then rendering the dynamic HTML using Django Templates.
First, let’s define a view function that renders a route containing products that match a specific slug. This function retrieves all the products from the database based on the provided slug, prepares the data as context for HTML rendering and returns the page.
# File: products/views.py

from django.shortcuts import render

from products.models import Product

def list_products(request, pk):
    products = Product.objects.filter(slug=pk).values('slug', 'image', 'description')
    context = { "products": products }
    return render(request, "index.html", context)
Next, let’s define the HTML for rendering the product information. Create a file index.html inside the mysite/products/templates directory that iterates over the products provided as the context by view function, and displays relevant information such as the product image.
mysite/products/templates/index.html
<!DOCTYPE html>
<html lang="en">
<head>
    <meta charset="UTF-8">
    <meta name="viewport" content="width=device-width, initial-scale=1.0">
    <title>Document</title>
</head>
<body>
    {% for product in products %}
        <img src="{{ product.image }}" />
    {% endfor %}
</body>
</html>
Finally, to start directing incoming requests to the view function you have created for products listing, import the views in mysite/mysite/urls.py and add a URL pattern to the urlpatterns array as following. The expression, <str:pk>/ refers to the slug that would be used to filter the set of products.
# mysite/mysite/urls.py

# ...

from products import views

urlpatterns = [
    # ...,
    path("<str:pk>/", views.list_products, name="product_listing_page"),
]
You have successfully set up views and templates to render product listings dynamically. However, as our application grows and user traffic increases, optimizing performance becomes crucial. One way to enhance performance is by caching database queries. Let's dive into caching PostgreSQL queries using Readyset.
Caching PostgreSQL Queries using Readyset
For testing purposes, let’s insert sample product information into our database by executing the following command in the psql shell:
postgres=> INSERT INTO products_product (slug, image, description)
VALUES ('product-1', 'https://picsum.photos/600', 'Description for Product 1.'),
	('product-2', 'https://picsum.photos/600', 'Description for Product 2.'),
	('product-3', 'https://picsum.photos/600', 'Description for Product 3.'),
	('product-4', 'https://picsum.photos/600', 'Description for Product 4.'),
	('product-5', 'https://picsum.photos/600', 'Description for Product 5.'),
	('product-6', 'https://picsum.photos/600', 'Description for Product 6.'),
	('product-7', 'https://picsum.photos/600', 'Description for Product 7.'),
	('product-8', 'https://picsum.photos/600', 'Description for Product 8.'),
	('product-9', 'https://picsum.photos/600', 'Description for Product 9.'),
	('product-10', 'https://picsum.photos/600', 'Description for Product 10.');
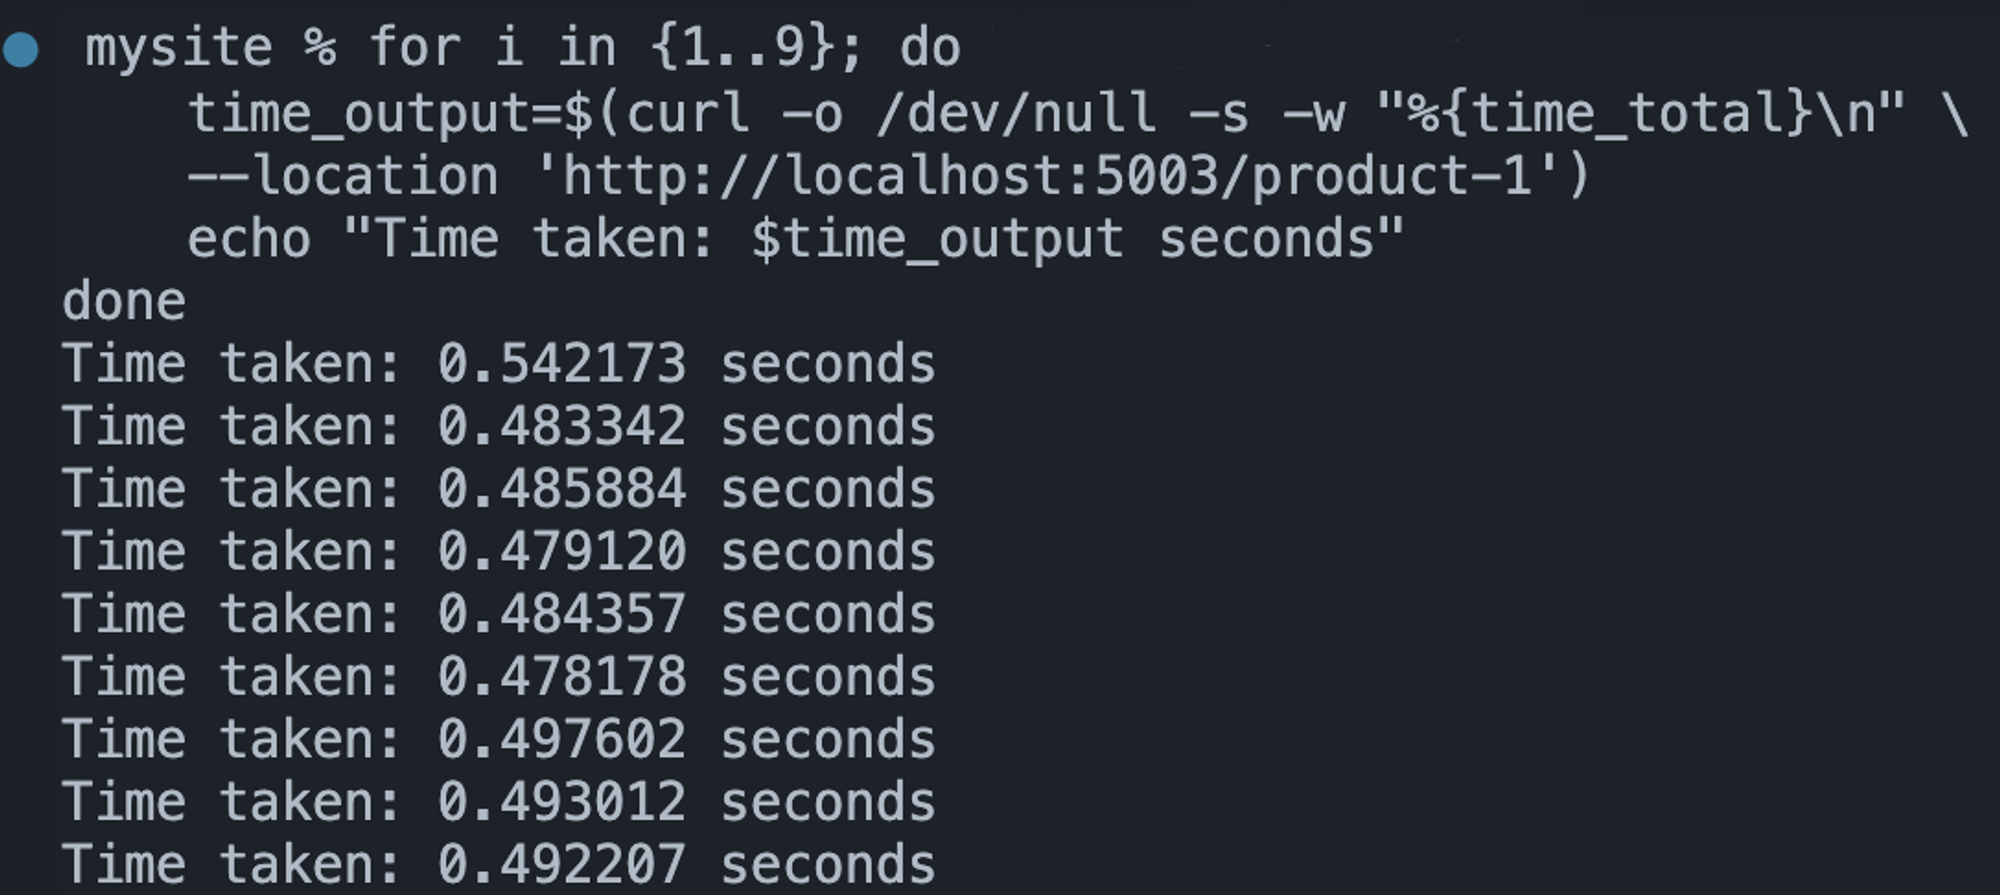
Now, let’s measure the response times for the page render using non-cached SQL query. Open another terminal window and execute the following command:
for i in {1..9}; do
    time_output=$(curl -o /dev/null -s -w "%{time_total}\n" \
    --location 'http://localhost:5003/product-1')
    echo "Time taken: $time_output seconds"
done
Take note of the times output in your terminal window indicating the seconds it took to render the page using non-cached SQL query as the data source. You are going to use it to compare the time it will take to render when the SQL query is cached.

Now, to cache the query using Readyset, execute the following command in the terminal connected to the Readyset Postgres instance:
CREATE CACHE ALWAYS FROM SELECT "products_product"."slug", "products_product"."image", "products_product"."description" FROM "products_product" WHERE "products_product"."slug" = $1;
Here's what each part of the command above does:
CREATE CACHE ALWAYS: This part of the command instructs Readyset to create a cache for the specified query and to always use this cache when executing the query.FROM SELECT ... $1: This part specifies the SQL query that will be cached.
This command essentially tells Readyset to cache the results of the specified query, ensuring that subsequent executions of the same query will be served from the cache, leading to faster response times. Great!
Now, let’s test if responses are being cached by executing the following command in your terminal once again:
for i in {1..9}; do
    time_output=$(curl -o /dev/null -s -w "%{time_total}\n" \
    --location 'http://localhost:5003/product-1')
    echo "Time taken: $time_output seconds"
done
The output in your terminal window would indicate the time (approximately) it took to respond to fetch the page. An immediate 10x decrease in the response times indicate cached responses being returned on the server-side.
Awesome! You are now successfully able to see the same URL much faster using the Readyset as the data source.
Thoughts
In conclusion, this guide has given you the basics to smoothly add Readyset to your Django apps. By using Readyset's real-time caching with Postgres, you can make your app faster and handle more users. With Readyset, you can keep data in sync and speed up reading data, making your app work better overall. You are now ready to boost your Django app's performance with Readyset!
Related articles
Continue reading more about postgresql.

PostgreSQL Readyset
Optimizing SQL Pagination in Postgres
SQL pagination is a technique to retrieve a subset of records from a Postgres table or result set. It allows you to divide large datasets into smaller, manageable chunks called "pages" and retrieve them one page at a time. Understanding Pagination in Postgres Pagination is commonly used in applications that display data in a paginated format, such as search results, product listings, or user records. It helps improve performance and user experience by loading and displaying only a portion o
2024-04-24·13 min read
PostgreSQL Marcelo Altmann
Mastering Query Rewriting for Faster PostgreSQL Performance
When you first spin up your app, the emphasis is on getting started and getting data to your clients. But when you don’t have throughput, you are also not going to have enough concurrency to unveil bad queries. But then you have success. And success means data. More users, more interactions, more everything. Suddenly, queries that performed fine are struggling under the load, hurting performance and scalability. This is all going to mean a far worse user experience when much higher costs becaus
Marcelo Altmann2024-04-11·9 min read
PostgreSQLMarcelo Altmann
How Platform Engineers Can Automate Postgres Maintenance
Database maintenance is a crucial ingredient for sustained performance and data integrity. For platform engineers, automating routine tasks within a PostgreSQL environment ensures both reliability and relieves team members from repetitive manual work. Here's a quick rundown of effective approaches: Fine-Tuning Autovacuum PostgreSQL's built-in autovacuum daemon automates essential VACUUM and ANALYZE operations. To get the most out of it: Verifying Autovacuum Enablement Ensure autovacuum
Marcelo Altmann2024-03-27·3 min read
Still scaling the hard way?
Modern applications demand instant performance, even under unpredictable load. Readyset helps you eliminate slow queries, stabilize latency, and scale confidently.
Revolutionize your database performance with Readyset
Serve requests at sub-millisecond latencies with the modern database scaling and query caching system for MySQL and PostgreSQL.
Join our newsletter
Stay updated with the latest news, insights, and developments from Readyset — straight to your inbox.