← Back to blogEngineering
A Deep Dive on Readyset Behind PgBouncer
The title of this post sets the stage for a compelling discussion, and I’ll start with a direct spoiler: Readyset is about performance. It delivers exceptional query acceleration because it behaves as an intelligent cache—without relying on traditional TTLs, background eviction processes, or complex locking mechanisms. More importantly, it integrates seamlessly with your existing application stack: no changes to application logic are required. From an architectural standpoint, Readyset drastical
Wagner Bianchi
2025-04-10 · 13 min read
The title of this post sets the stage for a compelling discussion, and I’ll start with a direct spoiler: Readyset is about performance. It delivers exceptional query acceleration because it behaves as an intelligent cache—without relying on traditional TTLs, background eviction processes, or complex locking mechanisms. More importantly, it integrates seamlessly with your existing application stack: no changes to application logic are required. From an architectural standpoint, Readyset drastically reduces infrastructure costs, often representing just a third of the total expense you’d incur by horizontally scaling out with additional hardware.
If you’re leveraging PgBouncer in your PostgreSQL deployment to optimize connection pooling, you’ve likely tuned your system to operate at peak efficiency—without overcommitting resources. But here’s the catch: what if you could go even further? Imagine boosting read performance, offloading backend pressure, and cutting costs traditionally associated with provisioning more read replicas. That’s precisely where Readyset comes in.
This post will explain how to introduce Readyset into your architecture as a standby-like node behind PgBouncer. This approach enhances the read capacity of your PostgreSQL cluster without the need to spin up additional replicas. As a hands-on exercise, you can restore the Northwind sample database to your primary PostgreSQL instance and use Readyset to create materialized query caches.
Note:
One key operational detail to keep in mind: if the Northwind database is restored using a PostgreSQL superuser other than the Readyset user created in this guide, you’ll need to reassign ownership of the relevant objects. Failing to do so will prevent Readyset from caching and accessing those queries, as it lacks the necessary privileges on the underlying relations.
If you want to go for the download of the database, below is what you need to do:
#: download the database dump and restore it
wget https://raw.githubusercontent.com/pthom/northwind_psql/master/northwind.sql
psql -U <dbuser> -W -h <db IP or DNS> -d template1 -c "create database northwind"
psql -U <dbuser> -W -h <db IP or DNS> -d northwind -f northwind.sql
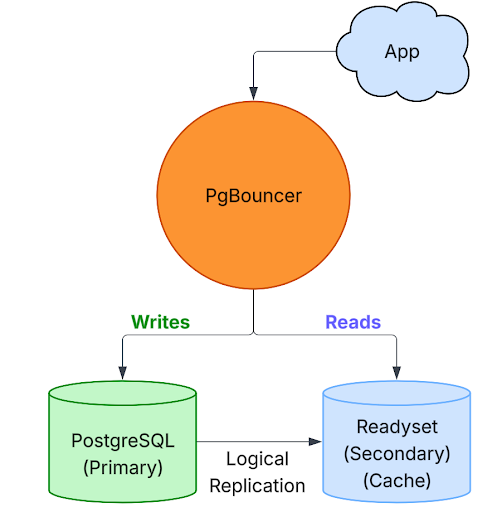
The architecture we’ll build features a standard PostgreSQL primary node. Still, with a key distinction: instead of provisioning a traditional streaming replica, we’ll introduce Readyset as a logical standby, purpose-built to serve cached query results with minimal latency. As an intelligent cache layer, Readyset integrates seamlessly with the primary database and responds to query workloads without adding pressure to the backend.
The diagram below illustrates the high-level topology we’ll construct and evolve throughout this blog.
To ground this setup in a practical scenario, let’s consider the following environment running on Ubuntu 24.10 LTS, with each component assigned a static IP:
- PgBouncer is located at 10.124.0.5
- The PostgreSQL primary database resides at 10.124.0.6
- The Readyset instance—acting as a logical read replica—is hosted at 10.124.0.3
The architecture diagram below depicts a single PostgreSQL primary node, a Readyset instance serving as a high-performance read layer, and PgBouncer operating as the connection proxy between clients and the backend systems. The intent is clear: read-heavy workloads are routed to Readyset, while all write operations are directed exclusively to the PostgreSQL primary node. This pattern reduces the load on the primary and increases scalability without sacrificing consistency.
PgBouncer can be deployed as a sidecar proxy running alongside applications or as a centralized proxy shared across services. It handles connection pooling, multiplexing, and redirection in a clean, abstracted layer.
What is PgBouncer?
Although often well-known in PostgreSQL environments, the fundamentals of PgBouncer are always worth revisiting: PgBouncer is a lightweight connection pooler built specifically for PostgreSQL. Its primary role is to mitigate the overhead associated with PostgreSQL’s process-based connection model, which can become costly in high-concurrency scenarios. Rather than allowing each client to open and close dedicated connections—which are relatively expensive—PgBouncer maintains a pool of active connections that can be reused across multiple client sessions.
It supports various pooling modes (such as session, transaction, and statement pooling) and includes robust administrative interfaces for managing connections and monitoring system behavior. PgBouncer’s efficiency becomes even more pronounced when it sits in front of caching layers like Readyset. It acts as the central broker for directing reads to the cache and writes to the primary.
apt update && apt -y upgrade
apt install -y pgbouncer
Once PgBouncer is installed and running, the next step is configuring its behavior by editing the pgbouncer.ini file located at /etc/pgbouncer/pgbouncer.ini. The configuration snippet below reflects a setup where all backend endpoints—PostgreSQL or Readyset—are accessed through a unified port. This design simplifies client connectivity by abstracting the routing complexity behind a single entry point.
Attention the [databases] section closely, defining how PgBouncer will proxy incoming connections to the appropriate backend targets. The consistent port usage across services highlights an intentional architectural choice to streamline how applications connect to different roles (primary vs. cache) in the system.
[databases]
primary   = host=10.124.0.6 port=5432 user=readyset password=123 dbname=readyset pool_size=100
secondary = host=10.124.0.3 port=5432 user=readyset password=123 dbname=readyset pool_size=100

[pgbouncer]
listen_addr          = 0.0.0.0
listen_port          = 5432
auth_type            = scram-sha-256
auth_file            = /etc/pgbouncer/userlist.txt
admin_users          = pgbouncer
pool_mode            = session
max_client_conn      = 200
default_pool_size    = 200
reserve_pool_size    = 20
pidfile              = /tmp/pgbouncer.pid
logfile              = /tmp/pgbouncer.log
log_disconnections   = 1
log_connections      = 1
log_pooler_errors    = 1
max_db_connections   = 500
max_user_connections = 200
query_timeout        = 0
client_idle_timeout  = 600
stats_period         = 30
so_reuseport         = 1
The userlist.txt file, referenced via the auth_file directive in PgBouncer, plays a critical role in client authentication. It contains the list of database users and their corresponding password hashes that PgBouncer uses to verify incoming connection requests. This file becomes especially important when PgBouncer is configured to handle authentication internally, decoupling it from the backend PostgreSQL server for performance and control reasons.
Below is a minimal example of how the userlist.txt file should be structured in this setup.
"Readyset" "SCRAM-SHA-256$4096:3NRVTeb9CWkqP9SsctpgQA==$jnjbYaAdXzwADFJZLjMIvB+wgUW7ayKDuGZdgwdRgeg=:wJP8j0V6f6B2uysrrvniYS3yyPe3GX6/SvWtU2qxn4U="
"pgbouncer" "SCRAM-SHA-256$4096:2+qtMyar4ngsTKNCArJXIw==$kR+yXp9L0nHKq7bITVj7yg6abfeQOffc71gFeLTdyxk=:GOfebwR2z+CFoUe7fSvRanzh3JPL7ScRr3NckU12IZE="
As emphasized earlier, storing passwords in plain or clear text must be strictly avoided. This practice fails to meet the baseline expectations of enterprise-grade security frameworks and exposes systems to unnecessary risk. Instead, use hashed credentials—preferably with strong hashing algorithms such as SCRAM-SHA-256—and ensure that authentication-related files, such as userlist.txt, are protected with restrictive file permissions and monitored as part of your security hygiene.
With the necessary authentication and routing configurations in place, you can start the PgBouncer service if it’s inactive. This step enables the connection proxy layer, facilitating efficient pooling and intelligent query routing between client applications, PostgreSQL, and Readyset.
The provisioning and configuration of the PostgreSQL primary database cluster are intentionally omitted from this guide as they fall outside the scope of this post. It is assumed that your PostgreSQL environment is already running and properly configured to serve as the authoritative source for replication and query data.
Enter Readyset, your Replica with an Intelligent Cache
Readyset is a purpose-built caching engine explicitly designed for SQL-based databases such as PostgreSQL and MySQL. Its primary goal is to optimize read-heavy workloads by offloading recurring and computationally expensive queries from the primary database layer. Unlike traditional replicas, which mirror the entire dataset and rely on query execution against physical tables, Readyset operates as a logical cache layer, ingesting data in real time and serving precomputed query results with minimal latency.
Rather than replicating the entire data set or relying on full-page fetches, Readyset connects to the upstream database in a strictly read-only mode and consumes changes directly from the WAL (Write-Ahead Log) in PostgreSQL or binary logs in MySQL. Based on this stream of changes, it incrementally constructs and maintains partially materialized views—specialized query-based caches continuously synchronized with the source database. This architectural approach allows Readyset to respond to repetitive queries with near-instantaneous speed while reducing the load on the primary database engine.
It’s critical to understand that Readyset is not a general-purpose read replica. Instead, it is a query-aware, dynamic, and intelligent cache layer—explicitly tailored to maximize the efficiency of high-throughput, read-dominant systems. One of its key architectural advantages is support for the PostgreSQL wire protocol (Frontend/Backend Protocol), which enables full compatibility with PostgreSQL-native tools and middleware such as PgBouncer. As a result, Readyset can be seamlessly inserted into existing environments without any changes to application code or client drivers.
A core differentiator between Readyset and conventional caching strategies—such as key-value stores (e.g., Redis) or manually managed materialized views—is cache freshness. In traditional models, caches often suffer staleness due to reliance on TTLs, scheduled refresh intervals, or manual invalidation logic. These approaches risk serving outdated data and introduce complexity in the application layer. Readyset avoids these pitfalls by directly observing the transactional log stream and applying changes incrementally and continuously, ensuring that cached query results reflect the latest state of the data.
Because Readyset does not require full cache refreshes—as is familiar with static materialized views—it eliminates downtime, race conditions, and performance bottlenecks typically associated with cache synchronization. This results in a high-performance, low-maintenance, and operationally predictable caching tier capable of scaling read-throughput in real-time environments.
To integrate Readyset into your system, simply configure it to connect to your upstream PostgreSQL instance using standard connection parameters (host, port, user, and authentication credentials). Once initialized, Readyset automatically begins tracking changes and building materialized query results. These query results are then exposed to clients and middleware, enabling applications to retrieve up-to-date data with dramatically reduced response times and no additional overhead on the primary database.
Let's download Readyset and install it:
$ wget https://github.com/Readysettech/Readyset/releases/download/stable-250123/Readyset_1.11.0-1_amd64.deb
$ dpkg -i Readyset_1.11.0-1_amd64.deb
As Readyset needs to connect to your upstream database to attach itself as a new standby, before you configure Readyset, you need to add the “Readyset” user to your primary database, as below:
create database readyset owner readyset;
create user readyset with login superuser password 'CUDq15Z0';
grant all privileges on database readyset to readyset;
Additionally, if your PostgreSQL primary cluster is on-premises, add the Readyset user to the pg_hba.conf, as below:
# PostgreSQL Client Authentication Configuration File
# ===================================================
# TYPE  DATABASE        USER            ADDRESS                 METHOD
host    all             Readyset        10.124.0.5/32           scram-sha-256
host    all             Readyset        10.124.0.3/32           scram-sha-256
One small comment about the set password for the Readyset user: do not rely on a simple password like that one. I recommend having at least a 40-chars password, micing up uppercase and lowercase characters, numbers, and symbols. Make it safe first.
Go to the configuration file located at /etc/Readyset/Readyset.cnf and adjust the below variables. It is essential to have that well set because the Readyset user needs to connect to the upstream database (your PostgreSQL, the primary database) and will connect using SCRAM-SHA-256, which has been the default encryption password-based authentication method since PostgreSQL 13.
UPSTREAM_DB_URL="postgres://Readyset:CUDq15Z0@10.124.0.6:5432/northwind"
LISTEN_ADDRESS="0.0.0.0:5432"
POSTGRES_AUTHENTICATION_METHOD=scram-sha-256
This way, you can also start Readyset.
systemctl enable --now readyset.service
systemctl status readyset.service
Check the Readyset log file:
tail -f Readyset.log.2025-04-03
...
2025-04-03T12:40:18.250481Z  INFO replicators::noria_adapter: Snapshot finished
2025-04-03T12:40:18.266228Z  INFO replicators::postgres_connector::connector: confirmed_flush_lsn="1/952AE0E8" wal_status="reserved"
2025-04-03T12:40:18.272816Z  INFO replicators::noria_adapter: Streaming replication started
Coming back to PgBouncer, you can authenticate with the pgbouncer user and execute the SHOW DATABASES to display the actual database names that PgBouncer connects to, along with the current applied connection limits for each database:
pgbouncer=# SHOW DATABASES;
-[ RECORD 1 ]--------------+-----------
name                       | primary
host                       | 10.124.0.6
port                       | 5432
database                   | Readyset
force_user                 | readyset
pool_size                  | 100
min_pool_size              | 0
reserve_pool_size          | 20
server_lifetime            | 3600
pool_mode                  |
load_balance_hosts         |
max_connections            | 500
current_connections        | 0
max_client_connections     | 0
current_client_connections | 0
paused                     | 0
disabled                   | 0
-[ RECORD 2 ]--------------+-----------
name                       | secondary
host                       | 10.124.0.3
port                       | 5432
database                   | readyset
force_user                 | readyset
pool_size                  | 100
min_pool_size              | 0
reserve_pool_size          | 20
server_lifetime            | 3600
pool_mode                  |
load_balance_hosts         |
max_connections            | 500
current_connections        | 1
max_client_connections     | 0
current_client_connections | 0
paused                     | 0
disabled                   | 0
Once you have the scenario ready, you can start checking which queries are going to Readyset and which ones have proper support to create caches.
Creating Caches on Readyset
First, we need to think about our application and how we will send SELECT queries to the standby or the Readyset, which mimics a standby. On PgBoucer, we created two database aliases, “primary” and “secondary”. That is valuable as that is what we will use to route queries.
If you started your Readyset instance and everything is OK, you can connect and check if your database tables were snapshotted, as below:
pgbouncer@p1:~$ psql -U Readyset -W -h @pgbouncer -d secondary -p 6432 -c "\d+"
Password:
                                              List of relations
 Schema|Name       |Type|Owner|Persistence|Access method|Size|Description
-------+-----------+----+-----+-----------+-------------+----+-----------
 public|categories            |table|Readyset|permanent|heap|16 kB     |
 public|customer_customer_demo|table|Readyset|permanent|heap|0 bytes   |
 public|customer_demographics |table|Readyset|permanent|heap|8192 bytes|
 public|customers             |table|Readyset|permanent|heap|40 kB     |
 public|employee_territories  |table|Readyset|permanent|heap|8192 bytes|
 public|employees             |table|Readyset|permanent|heap|16 kB     |
 public|order_details         |table|Readyset|permanent|heap|128 kB    |
 public|orders                |table|Readyset|permanent|heap|136 kB    |
 public|pgbench_accounts      |table|Readyset|permanent|heap|1301 MB   |
 public|pgbench_branches      |table|Readyset|permanent|heap|48 kB     |
 public|pgbench_history       |table|Readyset|permanent|heap|25 MB     |
 public|pgbench_tellers       |table|Readyset|permanent|heap|240 kB    |
 public|products              |table|Readyset|permanent|heap|8192 bytes|
 public|region                |table|Readyset|permanent|heap|8192 bytes|
 public|shippers              |table|Readyset|permanent|heap|8192 bytes|
 public|suppliers             |table|Readyset|permanent|heap|16 kB     |
 public|territories           |table|Readyset|permanent|heap|8192 bytes|
 public|us_states             |table|Readyset|permanent|heap|8192 bytes|
(18 rows)
The above shows that we can reach out to the current standby database, Readyset, which has already snapshotted the data we would like to work with. We can execute some queries and check their support. If interesting, we can create some caches and start responding to the resultset for the SELECT queries from the Readyset.
First, let's query the orders table. How many rows do we have for tables, orders, and customers? Additionally, how long does it take to query those tables?
pgbouncer@p1:~$ psql -U Readyset -W -h 10.124.0.5 -d secondary -p 6432

secondary=> select count(*) from orders;
 count
-------
   830
(1 row)

Time: 14.951 ms

secondary=> explain last statement;
 Query_destination | Readyset_error
-------------------+----------------
 upstream          | ok
(1 row)

Time: 0.927 ms
--
secondary=> select count(*) from customers;
 count
-------
    91
(1 row)

Time: 8.908 ms

secondary=> explain last statement;
 Query_destination | Readyset_error
-------------------+----------------
 upstream          | ok
(1 row)

Time: 0.886 ms
We don't have caches, but now we can check on Readyset to see if those queries support caching. We do that by connecting to the Readyset instance. We can connect remotely to the Readyset instance, as the upstream database is configured to allow the connection via the pg_hba.conf.
When the EXPLAIN LAST STATEMENT returns the Query_destination as upstream, we know that the query was routed to the primary database and was not served from caches on Readyset. Let's now connect to Readyset and use the SHOW PROXIED QUERIES command to check which queries have been executed and whether they are supported for cache creation.
pgbouncer@p1:~$ psql -U Readyset -W -h 10.124.0.3 -p 5432

psql (17.4 (Ubuntu 17.4-1.pgdg24.10+2), server 13.4 (Readyset))
Type "help" for help.

secondary=> show proxied queries;
      query id      |          proxied query           | Readyset supported | count
--------------------+----------------------------------+--------------------+-------
 q_73be087c5ab6224f | SELECT count(*) FROM "customers" | yes                |     0
 q_92f5043b0bae68d2 | SELECT count(*) FROM "orders"    | yes                |     0

(2 rows)

Time: 1.822 ms
All right, we have support for both queries. Let's create caches for them!
Readyset=> CREATE CACHE FROM q_73be087c5ab6224f;
Time: 430.387 ms

Readyset=> CREATE CACHE FROM q_92f5043b0bae68d2;
Time: 232.937 ms
If you keep your eyes on the Readyset logs after creating caches, you can see the below log entries:
2025-04-03T19:11:47.188130Z  INFO Readyset_server::controller::inner: creating cache q_73be087c5ab6224f
2025-04-03T19:11:55.936933Z  INFO Readyset_server::controller::inner: creating cache q_92f5043b0bae68d2
We can now rerun queries to count orders and customers and check the timing. The first execution from the cache won't be optimal, as partial cache materialization is formed for the repeating queries. That means the second execution on times should be submillisecond, as the cache will be used.
secondary=> select count(*) from orders;
 count(*)
----------
      830
(1 row)

Time: 1.265 ms

secondary=> select count(*) from orders;
 count(*)
----------
      830
(1 row)

Time: 0.005 ms

secondary=> explain last statement;
 Query_destination | Readyset_error
-------------------+----------------
 Readyset          | ok
(1 row)

Time: 1.060 ms

--
secondary=> select count(*) from customers;
 count(*)
----------
       91
(1 row)

Time: 1.079 ms

secondary=> select count(*) from customers;
 count(*)
----------
       91
(1 row)

Time: 0.057 ms

secondary=> explain last statement;
 Query_destination | Readyset_error
-------------------+----------------
 Readyset          | ok
(1 row)

Time: 1.042 ms
You can show the caches you created with the SHOW CACHES command and drop all the caches you created using the DROP ALL CACHES command. More commands to interact with Readyset are here.
Conclusion
By strategically positioning Readyset behind PgBouncer and routing read-intensive traffic through a dedicated logical alias, this architecture showcases a compelling, modern approach to scaling PostgreSQL environments without traditional read replicas' operational and financial weight. Readyset is not just another cache layer—it is a query-aware, real-time intelligent cache that tracks data changes through the WAL stream and delivers fresh, precomputed results without relying on TTLs, locks, or application-managed invalidation.
This setup significantly boosts read performance while reducing infrastructure costs—often to just a third of what would be needed to provision and operate additional standby nodes. It allows applications to interact with data through familiar PostgreSQL protocols, requiring no changes to the application codebase, no new drivers, and no complicated orchestration.
What you gain with Readyset is more than speed. You gain operational predictability, architectural clarity, and performance efficiency—all while freeing your primary PostgreSQL instance to focus on writes and transactional integrity.
In environments where query latency matters, scaling out with physical replicas introduces cost and complexity, or where cache consistency is paramount, Readyset emerges as a drop-in solution that simply works. With PgBouncer’s connection pooling and routing capabilities, it becomes a robust pattern for achieving high-throughput, low-latency data access in PostgreSQL environments.
This post walked through each step—from initial setup and configuration to cache creation and query validation—highlighting that Readyset isn’t just a performance enhancement. It’s a rethink of how we scale reads in PostgreSQL.
Related articles
Continue reading more about engineering.
Engineering Michael Victor Zink
From parser combinators to hand-written TDOP: On adopting sqlparser-rs at Readyset
How Readyset replaced its homegrown SQL parser with sqlparser-rs, improving performance, reducing maintenance overhead, and tackling a years long backlog of parsing edge cases along the way.
2026-05-21·19 min read
Engineering Vassili Zarouba
How Readyset Rewrites Your SQL: Inside the Query Transformation Pipeline
Why Query Rewriting Matters for Dataflow Most databases work the same way: a query arrives, the engine builds an execution plan, scans tables, joins rows, filters, aggregates, and returns the result. Every time the query runs, the work repeats from scratch. This pull-based model has served relational databases for decades, but it carries an inherent cost: read latency is proportional to the complexity of the query and the size of the data it touches. Readyset takes a fundamentally different ap
Vassili Zarouba2026-04-28·17 min read
EngineeringMichael Victor Zink
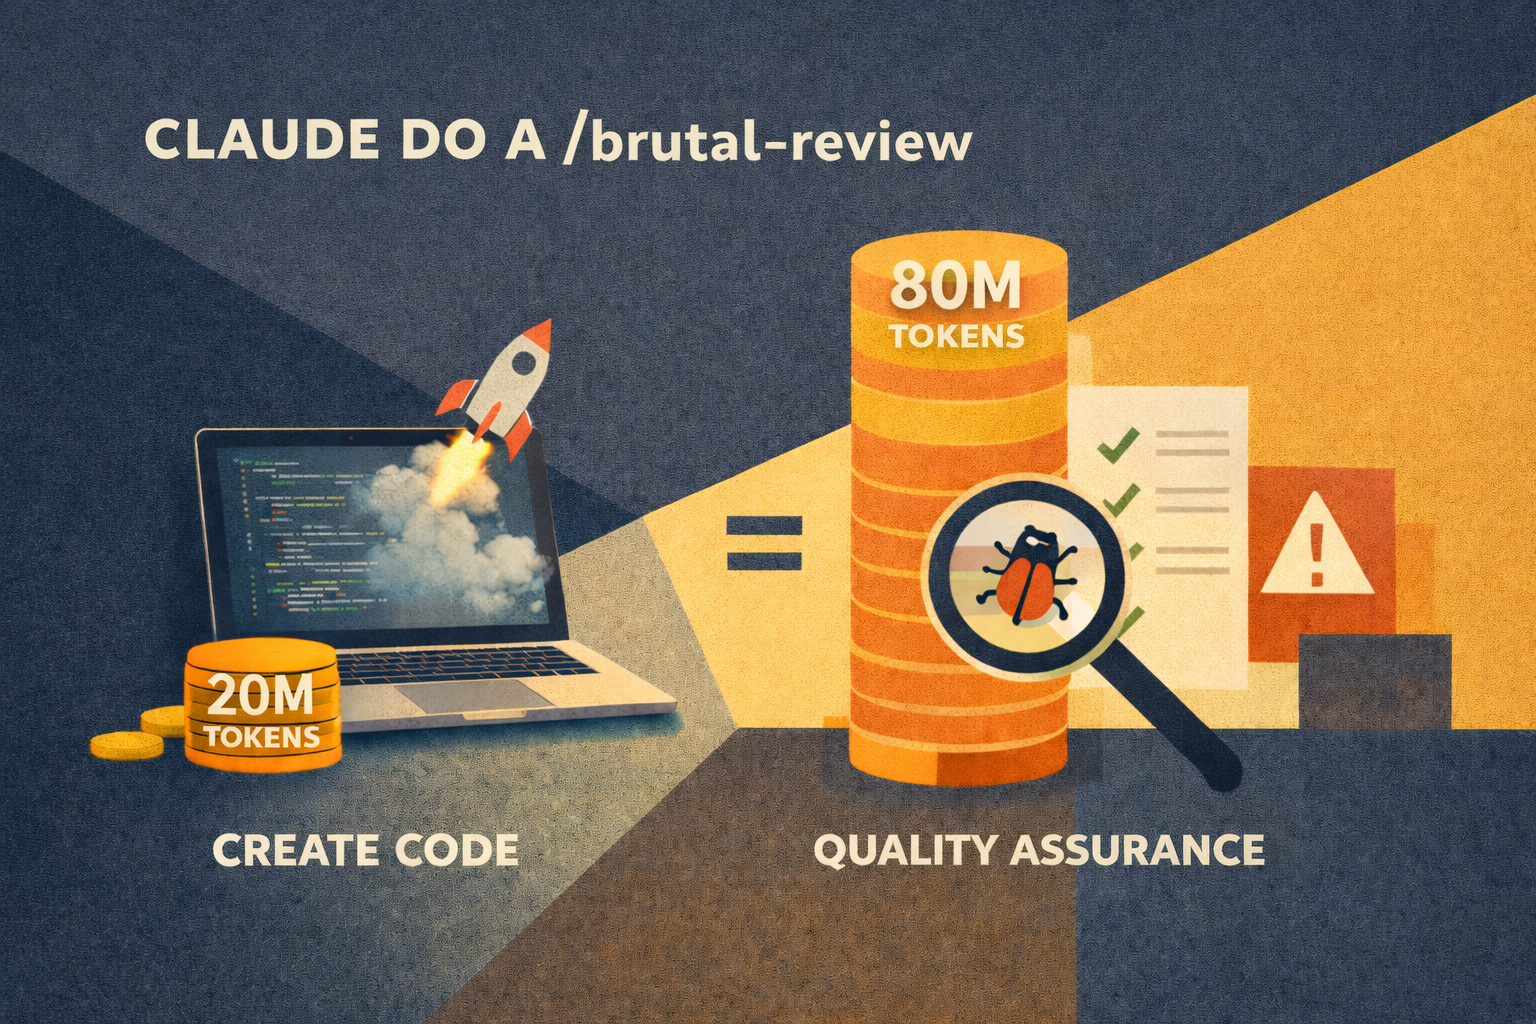
/brutal-review and the new 80/20 rule
(Mistakes and em-dashes are my own.) We have a Claude Code command in our monorepo which is a good example of what I’m calling the "80/20 token rule": if it takes 20M LLM tokens to write a feature, you should spend 80M on ensuring quality: safety measures, testing, and of course code review. If software quality was an open problem before, then agentic engineering has blown it even more wide opener. At a high level, here's what it does: 1. Read the patch to review and all related code. 2. Ha
2026-02-03·22 min read
Still scaling the hard way?
Modern applications demand instant performance, even under unpredictable load. Readyset helps you eliminate slow queries, stabilize latency, and scale confidently.
Revolutionize your database performance with Readyset
Serve requests at sub-millisecond latencies with the modern database scaling and query caching system for MySQL and PostgreSQL.
Join our newsletter
Stay updated with the latest news, insights, and developments from Readyset — straight to your inbox.